This might be the article I’ve been most excited to write so far. Now we’re finally getting into the real stuff, and I have to admit, I’m genuinely hyped. I know, I know… I’m a geek 🤓
📌Before We Start
Make sure to check out my previous article, especially if your Okta environment is still a clean slate. You’ll need a few things already set up before diving into this one.
🚀 I Have To Need to Integrate an App — How Do I Do It?
Alright, let’s get into it. Before anything else, you need to understand what kind of integration is possible based on the protocol the app supports. These are the protocols you must know. Seriously, tattoo them on your brain if you have to:
- OIDC (OpenID Connect): Built on OAuth 2.0. Let’s apps verify the user’s identity and securely retrieve user info.
- SAML 2.0 (Security Assertion Markup Language): XML-based protocol used to exchange authentication and authorization data between an IdP and a Service Provider (SP).
- SWA (Secure Web Authentication): A form of SSO where Okta injects credentials automatically into login forms. For apps that don’t support OIDC or SAML.
- API Services (OAuth 2.0 / Token-Based Access): Token-based API authentication, allowing apps to access resources on behalf of a user without exposing credentials.
In this article, I’ll focus only on OIDC and SAML 2.0, the two most secure and widely used protocols.
🔍 How OIDC Works, and When to Choose It
OIDC is a modern authentication protocol, designed specifically for login flows. It’s perfect for modern web and mobile applications. It gives you structured token flows, signed payloads, and strong session management.
✅ You should choose OIDC if:
- The application natively supports OIDC.
- You’re building your own web or mobile app.
- You need something lightweight, modern, and dev-friendly.
- You want fine-grained control over scopes, sessions, and claims.
🔐 How SAML 2.0 Works, and When to Choose It
SAML 2.0 is a well-established standard, especially in enterprise environments. It may be older, but it’s rock-solid for corporate SSO and has amazing documentation and tooling.
✅ You should choose SAML 2.0 if:
- The app is enterprise-grade.
- You want a combined integration with SCIM provisioning (big win).
- You need XML-based authentication with certificate signing.
- You want something mature, stable, and well-supported.
1️⃣ Case 1: Integrating My App Using OIDC
So you’ve decided OIDC is the best fit. Great! Grab a coffee and let’s walk through the steps.
🔧 Create the App in Okta
- Go to your Okta Admin Console
- Navigate to Applications > Applications
- Click Create App Integration
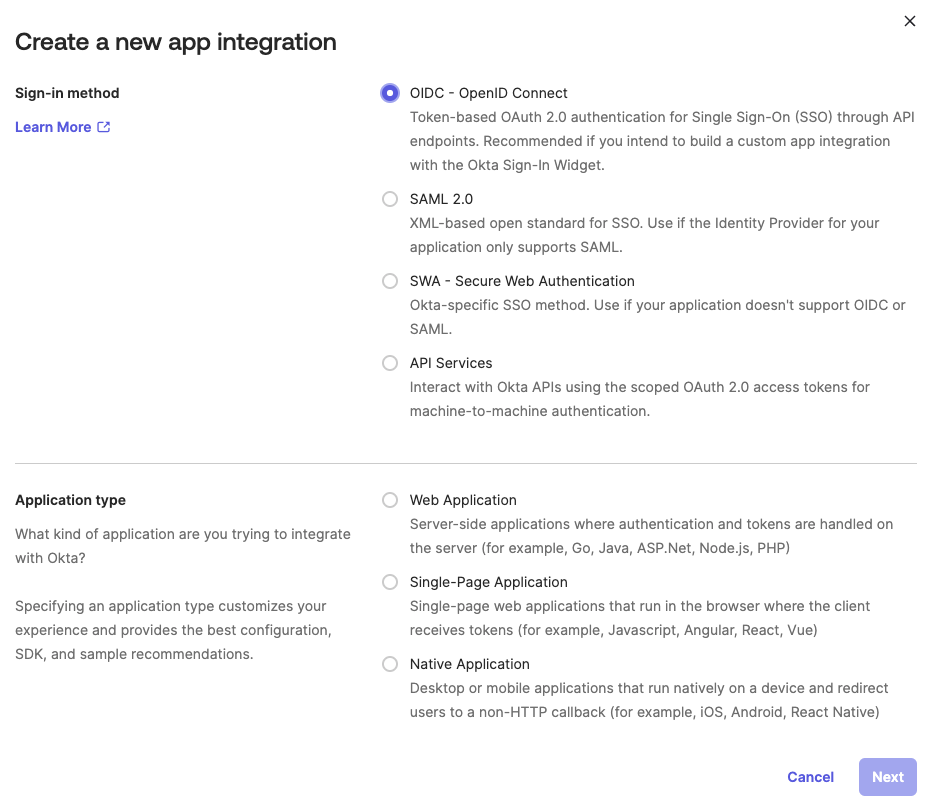
- Choose:
- Sign-in method:
OIDC - OpenID Connect - Application type:
Web,Single-Page App, orNative(depending on your app)
- Sign-in method:
- Click Next
⚙️ Configure the App
- App Name: Just a name to recognize the app.
- Sign-in redirect URIs: Where users land after login.
- Sign-out redirect URIs (optional): Personally, I avoid setting this unless necessary, as it can interfere with session management across apps.
Once that’s done, take note of the following:
- Client ID
- Client Secret
- Issuer URl / Authorization Server URL
Now, you’ll need to share this info with the service provider or implement it yourself if it’s your own app. But in this article, we’ll stay focused on the Okta side.
👥 Assign Users to the App
- Go to the app in Okta
- Open the Assignments tab
- Assign
usersor groups (avoid assigning users, trust me)
✅ Test the Authentication Flow
Always test the login flow end-to-end. I recommend using SP-Initiated Flow (more secure), though IdP-Initiated Flow is also possible.
2️⃣ Case 2: Integrating My App Using SAML 2.0
More into the SAML 2.0 route? Let’s get to it.
🔧 Create the App in Okta
- Go to your Okta Admin Console
- Navigate to Applications > Applications
- Click Create App Integration
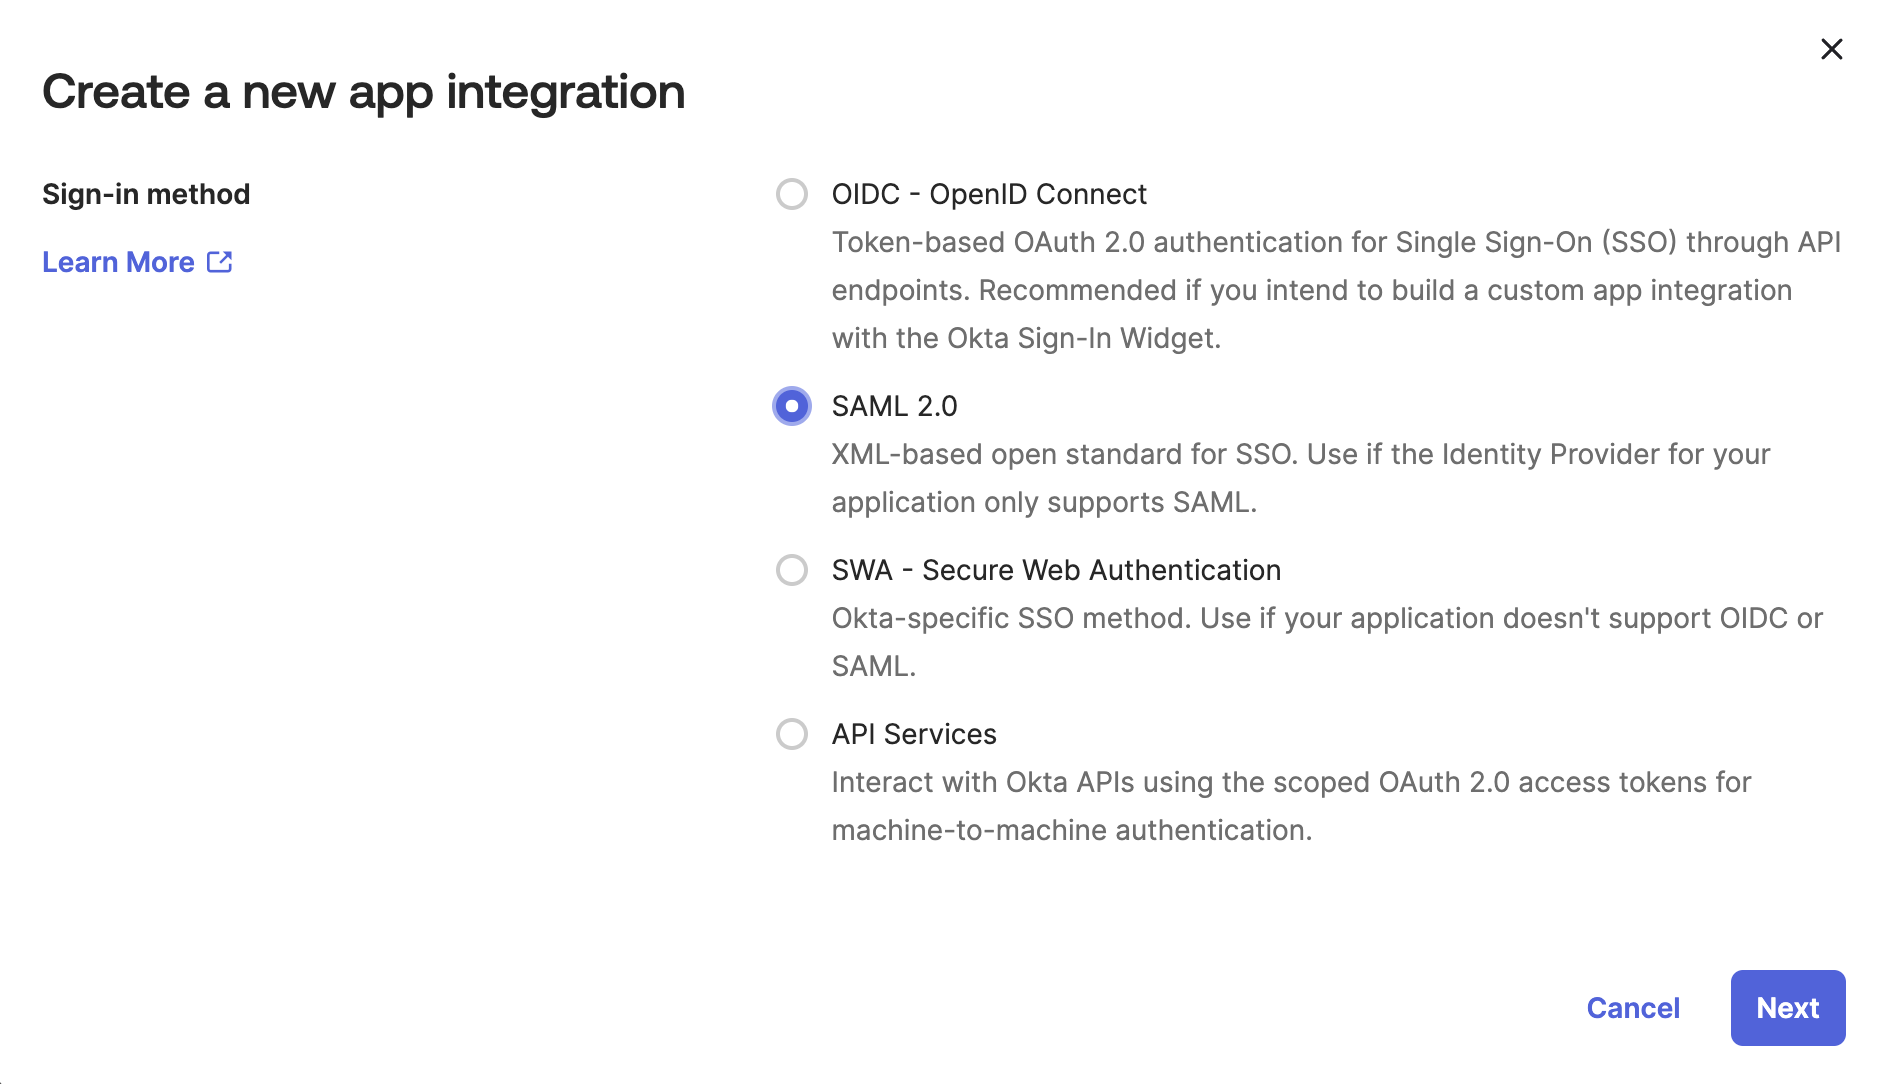
- Select:
- Sign-in method:
SAML 2.0
- Sign-in method:
- Click Next
⚙️ Configure the App
- App Name: A name to identify the app.
- Single sign-on URL (ACS URL): The app endpoint where Okta sends the SAML response
- Audience URI (Entity ID): Unique identifier of the app
- Name ID Format: Usually
EmailAddress - Application Username: How Okta sends the user (usually
EmailorOkta Username)
🧩 Map SAML Attributes (Optional)
You usually won’t need to change this unless your app expects specific attributes. If it does, you can map them here.
🚨Make sure to double-check this, incorrect attribute mapping is one of the most common reasons for failed SAML logins.
ℹ️ Get the Okta Metadata
Once everything is saved, go to the Sign On tab and copy:
- Identity Provider Single Sign-On URL
- Identity Provider Issuer
- X.509 Certificate
These values are needed to configure your app (Service Provider side) so it knows how to trust Okta.
👥 Assign Users to the App
- Open the Assignments tab in the app
- Assign
usersor groups
✅ Test the Login Flow
Just like with OIDC, I recommend starting with SP-Initiated Flow for more control.
✚ Extras You Should Consider
These are basic setups to get authentication up and running. But the real power comes when you start adding more layers. Here are a few things I strongly recommend looking into:
- 🔐 Authentication policies (mandatory!)
- 🔄 SCIM or JIT provisioning
- 📤 Push groups (if your app supports them)
💆🏻♂️ Final Thoughts
If you made it this far, thank you.
This stuff isn’t always easy, but it’s incredibly rewarding once you get it working.
Play around, break things, read docs (both official and unofficial), and keep improving your integration. And don’t stop there, enforce security policies, access controls, and build something robust, scalable, and secure.
Thanks for reading!
Wow! Many thanks for this article, Jordi. I can feel the passion in it. Looking for the next one 🤘🏼